Troubleshooting Blistering: Causes and Solutions
Coating blistering often stems from moisture, poor surface prep, or trapped gases during curing. This guide lists symptoms, likely causes, and fixes in a table, then gives prevention steps to stop coating failure before it reaches the customer.
- Inspect parts for bubbles, lifting, or rough texture before shipping to catch blistering early.
- Control moisture and heat during coating to prevent gas pockets from forming under the film.
- Use the right primer and surface prep for the base metal to stop adhesion failure.
- Document the process so the same conditions apply on every batch.
- Adjust oven temperature and dwell time if the coating cures too fast or too slow.
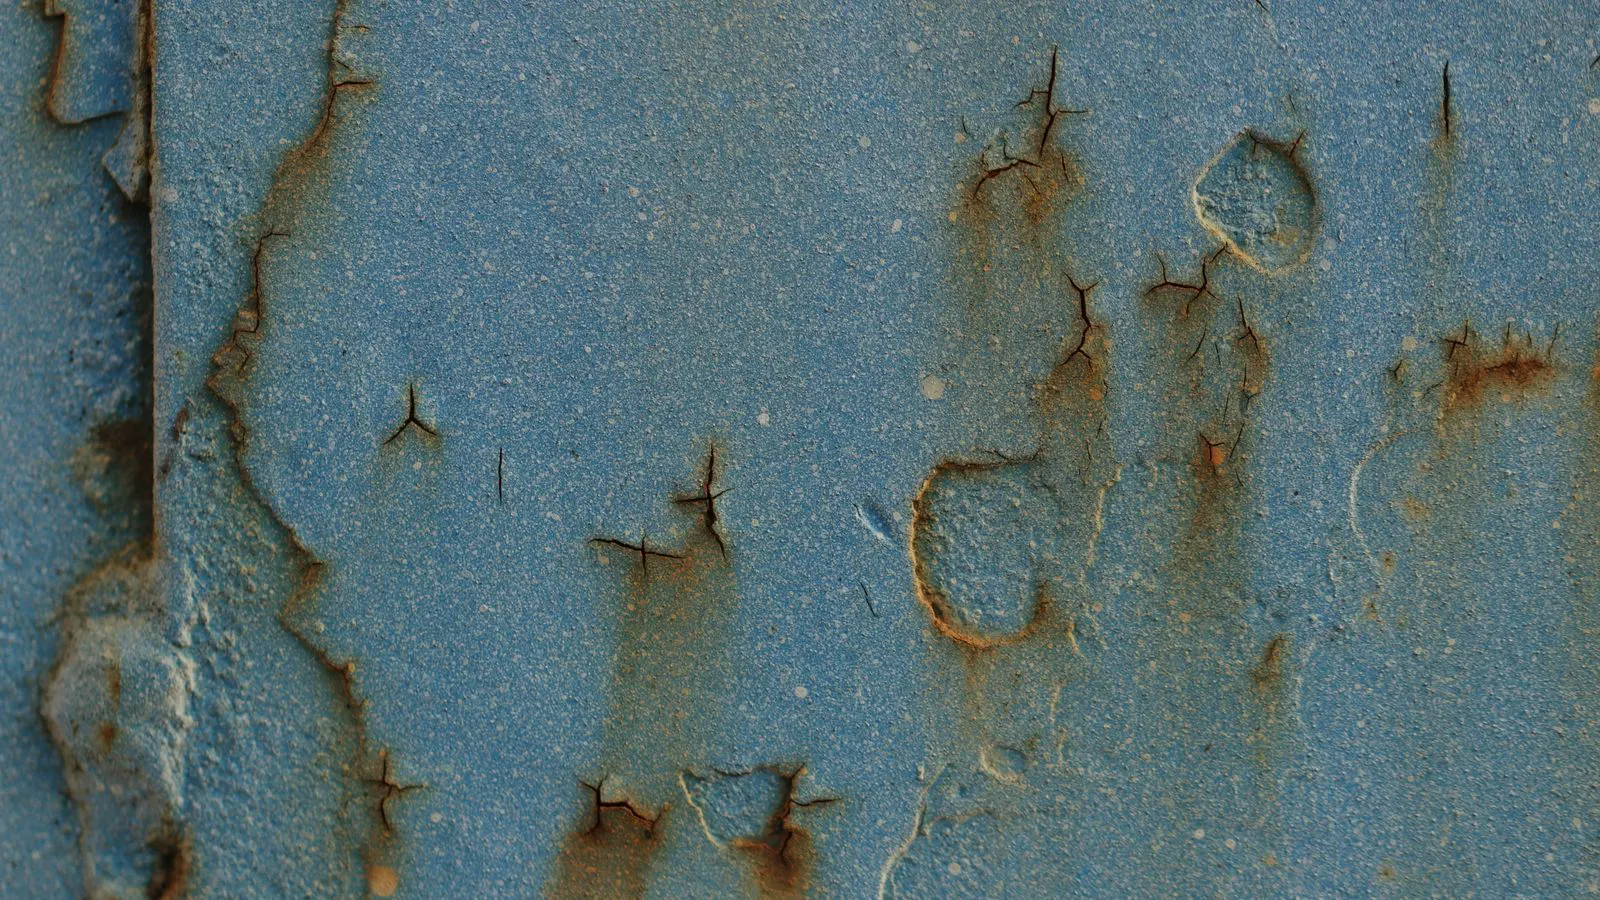
Coating blistering appears as raised bubbles under or on the surface of a finish. The coating lifts away from the metal, often after heat, humidity, or mechanical stress. For production shops and buyers, this is a visible defect that triggers rework, complaints, or line stoppages.
What Does Coating Blistering Look Like?
Blistering does not always show up immediately. Some blisters appear during the cure, others after storage, and some only after the part sees use. The exact appearance depends on the coating system, the substrate, and the failure mode.
Common visual signs include:
- Small, round bubbles scattered across the surface.
- Larger, irregular pockets where the coating lifts from the metal.
- A rough or dimpled texture when you run a finger over the part.
- Discoloration or yellowing around the blistered area.
- Peeling or lifting edges that separate from the substrate.
If the bubbles are soft and flexible, the coating may have trapped moisture. If they are hard and cracked, gas expansion from curing or heat exposure is more likely. Both scenarios point to a problem in how the part was prepared, coated, or cured.
What Are the Most Common Causes of Blistering?
Coating failure from blistering usually traces back to one of three areas: contamination, moisture, or curing. Each has distinct signs in the production line.
Contamination and Surface Prep
Oil, grease, fingerprints, or cleaning residues left on the metal create weak spots. The coating bonds poorly to the contaminated area, and any trapped liquid or gas pushes the film away from the substrate.
Typical mistakes:
- Rinsing parts but not drying them fully before coating.
- Using a degreaser that leaves a film or residue.
- Handling finished parts with bare hands after the final coat.
- Painting over dust that settled during a long drying period.
Moisture and Humidity
Water is the most common trigger for coating blistering. It can be present in the part, the shop air, or the coating itself. When moisture is trapped, it expands during heat treatment and creates bubbles.
Moisture gets in through:
- Inadequate drying after water-based pretreatment.
- High humidity in the coating area.
- Coating stored in wet or unsealed containers.
- Parts that sweat during storage before the next process.
Curing and Heat
The cure process is where many blistering problems become obvious. If the coating cures too fast, solvents or moisture release gas before the film hardens. If it cures too slowly, the part sits in a wet state long enough for contamination to weaken the bond.
Heat also plays a role. Parts that are still wet when they enter the oven or bake oven can trap vapor. The vapor expands and lifts the coating.
Troubleshooting Blistering: A Quick-Reference Table
Use this table to match the symptom you see on the line with the most likely cause and the next action to take.
| Symptom | Likely cause | What to do |
|---|---|---|
| Small, soft bubbles across large areas | Trapped moisture from wet parts or humid shop air | Extend drying time, check shop humidity, and verify the coating is dry before application. |
| Large, irregular blisters near edges or corners | Trapped gas from fast curing or poor ventilation | Slow the cure rate, improve airflow in the oven, and check for blocked vents. |
| Blistering only on certain batches | Contamination from a specific lot of parts or cleaning solution | Isolate the batch, re-degrease and rinse, and inspect the cleaning chemicals for residue. |
| Blistering after storage, not during production | Moisture absorbed during storage or condensation | Store parts in a dry area, use desiccant, and re-heat gently before inspection. |
| Blistering after the part is used in service | Thermal cycling or mechanical stress | Review the operating temperature range and confirm the coating is rated for that service. |
| Blistering in thin or uneven coats | Too much coating on one pass, causing solvent entrapment | Adjust spray distance and overlap, reduce the film thickness, and let the part level out between coats. |
The table above covers the most frequent production scenarios. If your situation is outside those, pull the part apart. Cut a small section and look at the interface between the metal and the coating. A clean, sharp line means the coating detached from the metal. A fuzzy or corroded line means the substrate was not ready.
How to Prevent Coating Failure Before It Hits the Line
Prevention is cheaper than rework. The goal is to remove the variables that create weak spots.
1. Standardize Surface Preparation
The metal surface must be clean, dry, and consistent. A good prep routine includes degreasing, rinsing, and a controlled drying step. For critical parts, use a dry-heat or compressed-air step to remove residual moisture.
If the part comes from a plating line, check the rinse water. Hard water spots can weaken the bond. Soft water is easier to control, but it still needs to be dry before the next coat.
2. Control the Environment
Coating areas should be clean and at a stable temperature. Dust and humidity are the two biggest enemies. Keep the coating line in a controlled space if the parts are sensitive. If full climate control is not practical, at least use a dust cover for wet parts and a dry area for pre-bake storage.
3. Match the Coating to the Substrate
Not every coating works on every metal. Some base metals release gases during heat treatment. Others have a natural oxide layer that needs a specific primer to bond well. Check the coating data sheet for recommended prep steps. If the substrate is aluminum, steel, or stainless, the prep and primer may differ.
4. Manage the Cure
The cure schedule is a balance. Too fast and gas is trapped. Too slow and moisture stays too long. Follow the coating manufacturer’s recommended temperature and dwell time. If your oven runs hot or uneven, calibrate it. Hot spots cause local blistering that is hard to trace.
5. Inspect at Every Stage
A quick visual check after prep, after coat, and after cure catches problems early. If you find a few blisters, stop and investigate. Do not assume the next batch will be fine. The root cause is usually still there.
What to Do When You Find Blistering on Finished Parts
If you are receiving blistered parts or finding them on your own line, follow a structured response.
- Stop the affected batch. Do not ship or move it to the next process.
- Document the defect. Take photos from different angles and note the location on the part.
- Pull a sample. Cut or grind a small section to see the interface between the metal and the coating.
- Check the production record. Look at the prep chemicals, coating lot, cure settings, and shop conditions.
- Isolate the variable. If only one line, one shift, or one chemical lot is affected, narrow the search.
- Fix the process. Correct the drying, prep, or cure step.
- Verify with a test batch. Run a small batch through the corrected process before releasing the full lot.
This sequence prevents a small problem from becoming a large production loss. It also gives you a clear record to share with the coating supplier if the issue is outside your control.
When to Call the Coating Supplier
Some blistering is a coating formulation problem. If the defect appears consistently on a specific product and your prep is correct, the coating may not be compatible with the substrate or the service conditions.
Contact the supplier with:
- Photos of the defect.
- A sample part if possible.
- The prep steps you used.
- The cure settings.
- The storage and service conditions.
The supplier can confirm whether the coating is rated for the substrate, suggest a different primer, or adjust the cure profile. Do not assume the coating is bad if the prep was skipped. The supplier will not fix a problem caused by contamination.
How to Reduce Cost and Lead Time Loss from Blistering
Blistering causes more than cosmetic waste. It stops lines, triggers rework, and delays shipments. Reducing it is a cost and lead time issue.
Practical steps:
- Add a moisture check after water-based pretreatment. A quick touch test or a moisture meter helps.
- Keep a log of shop humidity and temperature during coating.
- Store wet parts in a closed area to prevent dust and condensation.
- Use a consistent spray pattern and distance to avoid thick spots.
- Calibrate the oven regularly. Hot spots cause local failures.
- Train operators to spot early blisters and stop the line.
These steps are low cost and high impact. They prevent the most common causes of coating blistering before they become a production problem.
Blistering is a failure you can diagnose and stop. It is not random. It comes from moisture, contamination, or cure issues. By inspecting the part, checking the process, and fixing the root cause, you can stop coating failure before it reaches the customer and before it eats into your margin.
Frequently asked questions
Can you paint over blistering to hide it?
No. Painting over a blister does not fix the adhesion problem. The bubble will likely grow or pop, and the new coat will fail too. Strip, prep, and re-apply the coating properly.
Does blistering mean the metal is corroding?
Not always. Blistering can be caused by trapped moisture or gas without metal corrosion. If the coating peels away, check the substrate for rust or pitting. If the metal is clean, the issue is in the coating or prep.
How long do parts need to dry before curing?
It depends on the coating. Some water-based systems need full dry before the oven. Others can go into a low-heat bake to remove residual moisture. Follow the coating data sheet for the exact time.
Can humidity in the shop cause blistering?
Yes. High humidity slows drying and can leave moisture in the coating. If the shop is humid, extend drying time or use a dehumidifier in the coating area.
How do I know if the coating or the metal caused the problem?
Cut a small sample and inspect the interface. If the metal surface is corroded or pitted, the substrate is the issue. If the metal is clean but the coating lifts, the problem is in the prep, coating, or cure.